
Backing up AKS cluster with Velero
Backing up AKS clusters is really important. Even if you’re using Infrastructure as Code and all deployments are automated, you will benefit from taking backups of AKS clusters.
Velero is an open source tool that helps backup and restore Kubernetes resources. It also helps with migrating Kubernetes resources from one cluster to another. Also, it can help backup/restore data in persistent volumes.
During a disaster, recreating new infrastructure and re-deploying all components can take time. By using a tool like Velero to backup all Kubernetes resources, a cluster can be quickly restored to a certain state, lessening recovery time from ~45 minutes to ~15 minutes.
Benefits of using Velero:
- Take scheduled backups of your cluster and restore it in case of loss.
- Migrate cluster resources to other clusters.
- Replicate your production cluster to development and testing clusters.
How Velero works:
Kubernetes stores cluster state (basically the k8s API objects) in the folder within the cluster /etcd. Velero keeps backup of this folder in some remote location of your choice. The only condition is these remote locations should be object stores. Common examples are AWS S3 buckets and Azure Blob Storage. Now even if your cluster dies you know the state through
these remote locations and can be restored, again with the help of Velero.
Installation:
There are two main methods of installation:
• The Velero CLI
• A Helm Chart
We will be installing the Velero CLI on Host machine and use HELM chart to deploy the Velero Controller on Kubernetes cluster.
Installing the Velero CLI:
- Use wget and the link you copied earlier to download the release tarball:
wget https://github.com/vmware-tanzu/velero/releases/download/v1.5.3/vele ro-v1.5.3-linux-amd64.tar.gz
- Untar the downloaded package.
tar -xvzf velero-v1.5.3-linux-amd64.tar.gz
• Verify that you can run the velero client by executing the binary:
./velero-v1.2.0-linux-amd64/velero help
You should see the following help output:
Output
Velero is a tool for managing disaster recovery, specifically for Kubernetes
cluster resources. It provides a simple, configurable, and operationally robust
way to back up your application state and associated data.
If you're familiar with kubectl, Velero supports a similar model, allowing you to
execute commands such as 'velero get backup' and 'velero create schedule'. The same
operations can also be performed as 'velero backup get' and 'velero schedule create'.
Usage:
velero [command]
Available Commands:
backup Work with backups
backup-location Work with backup storage locations
bug Report a Velero bug
client Velero client related commands
completion Output shell completion code for the specified shell (bash or zsh)
create Create velero resources
delete Delete velero resources
describe Describe velero resources
get Get velero resources
help Help about any command
install Install Velero
plugin Work with plugins
restic Work with restic
restore Work with restores
schedule Work with schedules
snapshot-location Work with snapshot locations
version Print the velero version and associated image
. . .
- At this point you should move the velero executable and add it to your PATH. To add it to your PATH on an Ubuntu system, simply copy it to /usr/local/bin: or /usr/bin in centos.
sudo mv velero-v1.5.3-linux-amd64.tar.gz/velero /usr/local/bin/velero
Now that we have successfully installed Velero, we will setup it for backing up the Kubernetes cluster (AKS).
Setting up the credentials and Authentication:
- Start by getting the resource group where the virtual machines for your AKS cluster.
AZURE_RESOURCE_GROUP=$(az aks show -n mycluster -g myresourcegroup --query "nodeResourceGroup" -o tsv)
2. Then, get the Azure subscription and Azure AD tenant information.
AZURE_SUBSCRIPTION_ID=$(az account list --query '[?isDefault].id' -o tsv)
AZURE_TENANT_ID=$(az account list --query '[?isDefault].tenantId' -o tsv)
3. Now create an Azure service principal for Velero to authenticate. I like to name the service principal with the name of the cluster so that I know which Velero identity belongs to which cluster.
Note: you can also limit the scope of the service principal to certain resource groups --scopes so that it doesn’t have access to the entire subscription.
AZURE_CLIENT_SECRET=$(az ad sp create-for-rbac --name "mycluster-velero" --role "Contributor" --query 'password' -o tsv)
4. Get the Client Id for the service principal
AZURE_CLIENT_ID=$(az ad sp list --display-name "mycluster-velero" --query
'[0].appId' -o tsv)
5. Create a file called credentials-velero. Do not commit this to source control.
cat << EOF > ./credentials-velero
AZURE_SUBSCRIPTION_ID=${AZURE_SUBSCRIPTION_ID}
AZURE_TENANT_ID=${AZURE_TENANT_ID}
AZURE_CLIENT_ID=${AZURE_CLIENT_ID}
AZURE_CLIENT_SECRET=${AZURE_CLIENT_SECRET}
AZURE_RESOURCE_GROUP=${AZURE_RESOURCE_GROUP}
AZURE_CLOUD_NAME=AzurePublicCloud
EOF
6. The Storage Account setup for storing the backups
First, create a storage account, this will store the backups.
STORAGE_ACCOUNT='stmyapptest001'
STORAGE_RESOURCE_GROUP='rg-myapp-test-001'
az storage account create -n $STORAGE_ACCOUNT -g $STORAGE_RESOURCE_GROUP
7. Then, create the container to place the backups. I also like to name the container name after the cluster.
STORAGE_CONTAINER_NAME='backups-mycluster'
az storage container create --account-name $STORAGE_ACCOUNT -n $STORAGE_CONTAINER_NAME
8. Using kubectl, upload the credentials to a kubernetes secret in a new velero namespace.
kubectl create ns velero
kubectl create secret generic velero-credentials -n velero --fromliteral="cloud=$(cat ./credentials-velero)"
Deploying Velero on Kubernetes cluster:
Now, we deploy the Velero using Helm on AKS cluster.
1) First, add the VMware Tanzu Helm repo.
helm repo add vmware-tanzu https://vmware-tanzu.github.io/helm-charts
2) Lastly, install the helm chart.
helm install velero vmware-tanzu/velero --namespace velero --version 2.13.2 \
--set "initContainers[0].image=velero/velero-plugin-for-microsoftazure:v1.1.0" \
--set "initContainers[0].imagePullPolicy=IfNotPresent" \
--set "initContainers[0].volumeMounts[0].mountPath=/target" \
--set "initContainers[0].volumeMounts[0].name=plugins" \
--set "initContainers[0].name=velero-plugin-for-azure" \
--set credentials.existingSecret='velero-credentials' \
--set configuration.provider='azure' \
--set configuration.backupStorageLocation.bucket=$STORAGE_CONTAINER_NAME \
--set configuration.backupStorageLocation.config.resourceGroup=$STORAGE_RESOURCE_GROUP \
--set
configuration.backupStorageLocation.config.storageAccount=$STORAGE_ACCOUNT \
--set
configuration.backupStorageLocation.config.subscriptionId=$AZURE_SUBSCRIPTION_ID \
--set configuration.volumeSnapshotLocation.name='azure-eastus' \
--set
configuration.volumeSnapshotLocation.config.resourceGroup=$STORAGE_RESOURCE_GROUP \
--set
configuration.volumeSnapshotLocation.config.subscriptionId=$AZURE_SUBSCRIPTION_ID
3) You should see Velero’s pods come up.
kubectl get pods -n velero
Testing Backup and Restore Procedure:
Now that we’ve successfully installed and configured Velero, we can create a test Nginx Deployment, with a Persistent Volume and Service. Once the Deployment is running we will run through a backup and restore drill to ensure that Velero is configured and working properly.
Make sure you are in same directory where we untar the velero package.
- Open this file using your editor of choice:
cd velero-v1.5.3-linux-amd64/examples/nginx-app
- Use Kubectl command to deploy the yaml file.
kubectl create -f with-pv.yaml
You should see the following output:
output
namespace/nginx-example created
persistentvolumeclaim/nginx-logs created
deployment.apps/nginx-deploy created
service/nginx-svc created
- Check that the Deployment succeeded:
kubectl get deployments --namespace=nginx-example
- You should see the following output:
Output
NAME READY UP-TO-DATE AVAILABLE AGE
nginx-deploy 1/1 1 1 1m23s
- Once Available reaches 1, fetch the Nginx load balancer’s external IP using kubectl get:
kubectl get services --namespace=nginx-example
- You should see both the internal CLUSTER-IP and EXTERNAL-IP for the my nginx Service:
Output
NAME TYPE CLUSTER-IP EXTERNAL-IP PORT(S) AGE
nginx-svc LoadBalancer 10.245.147.61 159.203.48.191 80:30232/TCP 3m1s
Note the EXTERNAL-IP and navigate to it using your web browser.
This indicates that your Nginx Deployment and Service are up and running.
We can now perform the backup procedure to copy all nginx Kubernetes objects and take a Snapshot of the Persistent Volume we created when deploying Nginx.
- We’ll create a backup called nginx-backup using the velero command line client:
velero backup create nginx-backup --selector app=nginx
The --selector app=nginx instructs the Velero server to only back up Kubernetes objects with the app=nginx Label Selector.
You should see the following output:
Output
Backup request "nginx-backup" submitted successfully.
Runvelero backup describe nginx-backuporvelero backup logs nginxbackupfor more details.
Running velero backup describe nginx-backup --details should provide the following output after a short delay:
Output
Name: nginx-backup
Namespace: velero
Labels: velero.io/backup=nginx-backup
velero.io/pv=pvc-6b7f63d7-752b-4537-9bb0-003bed9129ca
velero.io/storage-location=default
Annotations:
Phase: Completed
Namespaces:
Included: *
Excluded:Resources:
Included: *
Excluded:
Cluster-scoped: auto
Label selector: app=nginx
Storage Location: default
Snapshot PVs: auto
TTL: 720h0m0s
Hooks:
Backup Format Version: 1
Started: 2020-01-02 23:45:30 -0500 EST
Completed: 2020-01-02 23:45:34 -0500 EST
Expiration: 2020-02-01 23:45:30 -0500 EST
Resource List:
apps/v1/Deployment:
- nginx-example/nginx-deploy
apps/v1/ReplicaSet:
- nginx-example/nginx-deploy-694c85cdc8
v1/Endpoints:
- nginx-example/nginx-svc
v1/Namespace:
- nginx-example
v1/PersistentVolume:
- pvc-6b7f63d7-752b-4537-9bb0-003bed9129ca
v1/PersistentVolumeClaim:
- nginx-example/nginx-logs
v1/Pod:
- nginx-example/nginx-deploy-694c85cdc8-vknsk
v1/Service:
- nginx-example/nginx-svc
Persistent Volumes:
pvc-6b7f63d7-752b-4537-9bb0-003bed9129ca:
Snapshot ID: dfe866cc-2de3-11ea-9ec0-0a58ac14e075
Type: ext4
Availability Zone:
IOPS:
This output indicates that nginx-backup completed successfully. The list of resources shows each of the Kubernetes objects that was included in the backup. The final section shows the PersistentVolume was also backed up using a filesystem snapshot.
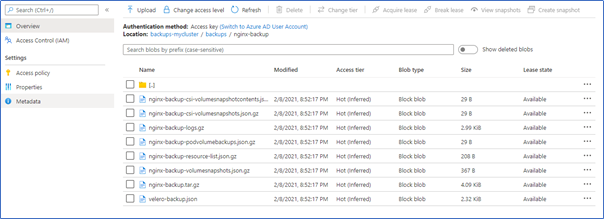
You should see a new directory called nginx-backup containing the Velero backup files.
You should see a Snapshot corresponding to the PVC listed in the below output.
Let’s first delete the nginx-example Namespace. This will delete everything in the Namespace, including the Load Balancer and Persistent Volume:
kubectl delete namespace nginx-example
Verify that you can no longer access Nginx at the Load Balancer endpoint, and that the nginx-example Deployment is no longer running:
kubectl get deployments --namespace=nginx-example
Output
No resources found in nginx-example namespace.
We can now perform the restore procedure, once again using the velero client:
velero restore create --from-backup nginx-backup
Here we use create to create a Velero Restore object from the nginx-backup object.
Output
Restore request "nginx-backup-20200102235032" submitted successfully.
Run `velero restore describe nginx-backup-20200102235032` or `velero restore logs nginx-backup-20200102235032` for more details.
Check the status of the restored Deployment:
kubectl get deployments --namespace=nginx-example
Output
NAME           READY   UP-TO-DATE   AVAILABLE   AGE
nginx-deploy   1/1     1            1           58s
kubectl get pvc --namespace=nginx-example
Output
NAME STATUS VOLUME CAPACITY ACCESS MODES STORAGECLASS AGE
nginx-logs Bound pvc-6b7f63d7-752b-4537-9bb0-003bed9129ca 5Gi RWO do-block-storage 75s
The restore also created a LoadBalancer. Sometimes the Service will be re-created with a new IP address. You will need to find the EXTERNAL-IP address again:
kubectl get services --namespace nginx-example
Output
NAME        TYPE           CLUSTER-IP     EXTERNAL-IP
PORT(S)        AGE
nginx-svc   LoadBalancer   10.245.15.83   159.203.48.191   80:31217/TCP   97s
Navigate to the Nginx Service’s external IP once again to confirm that Nginx is up and running.
Conclusion:
In this guide we installed and configured the Velero Kubernetes backup tool on a Azure Kubernetes cluster. We configured the tool to back up Kubernetes objects to Azure Storage Account and back up Persistent Volumes using Block Storage Volume Snapshots.
Velero can also be used to schedule regular backups of your Kubernetes cluster for disaster recovery. To do this, you can use the velero schedule command. Velero can also be used to migrate resources from one cluster to another.
Setting up the schedule:
“Backup cluster every day at 8 am”
velero schedule create every-day-at-8 --schedule "0 8 * * *"